Perils of Design: @font-face and Legendum

When @font-face CSS font replacement became supported by enough major browsers to get designers off the “web safe” font treadmill, most of us took a quiet moment to cry a small tear of relief.   We knew it would have challenges, we knew that Internet Explorer would demand we did something extra and finicky to cushion its fragile ego.  But at long last we were no longer caught between SEO demands that text be indexable, and user desires for a beautiful site.  And for the most part, it has been worth the effort.

We may have the occasional hiccup, and we’ve learned to be wary of things like the variability of font weights and the occasional difficulty of getting a complete set of files in order to ensure an <em> or a <strong> (or, heaven forfend, something which has both) will actually display the way intended.  But recently I encountered the single weirdest @font-face bug yet.

We’d built the site according to the original design mockup, and it was beautiful and had fantastic usability for a target audience which was not known to be particularly tech-savvy.  We were nearly ready to launch, and I was (forgivably?) proud.  Final details were being tidied up in preparation when…we were informed that the address for the client was wrong on the website.  They were located at 239 Madeup St., not 236.  Simple enough, one five second fix and…huh.  It’s not fixing it.  Looks right on the back end, still not the right numbers on the front end…what the hell is going on?  These are the moments where you are quite sure you have finally made it into the Twilight Zone.

After twenty maddening minutes, during which I verified that it was specifically a problem with Legendum and the @font-face replacement, reconverted and reinstalled the font no less than three times, beat my head against the edge of my desk until it dented, and cried little salty tears of designer fury, I still had not managed to get “9” to appear on the page.  So I ran with a different font and slunk away defeated.

It turns out that Legendum, when converted for @font-face and viewed on a Mac, doesn’t flip the single character it uses for both “6” and “9”.

That’s what you need to know, and I’m telling you so that you won’t suffer as I have suffered.  You can run it through a font editor and flip it yourself, if you have your heart really set on Legendum.  But otherwise it’s never going to work.  On a Mac.  For once, your Windows users will be just fine.

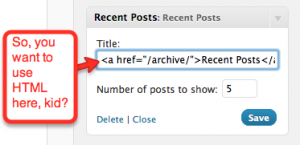
How to use HTML in WordPress’s widget’s title

Recent Posts w/ html

So, you want to use HTML here, kid?


If you want to use HTML in the title of any of the standard wordpress built-in widgets, you’ll find that the WordPress core doesn’t have any support for this. The functions that create these widgets hard code a PHP strip_tags() function call into them, making it impossible to remove in your functions.php file with something like a remove_filter() call. And if you edit your wp-includes/default-widgets.php file, the next (and there is always a next!) WP upgrade will run over your changes.

One solution is to use plugins for each standard widget you want to replace. You’ll end up with a replacement widget for each of the standard widgets, which includes the text widget, related posts widget, search widget, etc… Then you’ll have to either tell your less-technical user base, “Don’t use the standard widgets, use these special ones”, and hope they will remember, or find a spiffy way of hiding some of the standard WordPress widgets. And, if you find a replacement for each one, you’ll have to upgrade them all constantly.

In this article we will explain the other, better, solution, overriding the standard plugins with our own copy. We’ll keep our copy in the theme directory, next to the functions.php, so it’ll be upgrade safe, and call it from our functions.php. We’ll use the text widget as our example there, but this can be duplicated for each widget you want to override.

Step One: Create the custom_widgets.php file

Since we are going to be copying chunks of the default-widget.php file and editing, we’ll store this in a separate file instead of in the functions.php. Open your wp-includes/default-widgets.php and find the entire class, starting with:

[php] class WP_Widget_Text extends WP_Widget { [/php]

and copy it into your file.

Now rename the class, by changing the class declaration to:

[php]class WP_Widget_Text_Custom extends WP_Widget_Text {[/php]

Step Two: Link to your file

in your functions.php file, we are going to tell WordPress to use our code instead of the default widget code:
[php]
if (include(‘custom_widgets.php’)){
add_action("widgets_init", "load_custom_widgets");
}
function load_custom_widgets() {
unregister_widget("WP_Widget_Text");
register_widget("WP_Widget_Text_Custom");
}
[/php]

Ok, so if we find our special file and load it, we then can run our special function, which removes the text widget with unregister_widget(), and then loads our widget instead. Since we didn’t edit the internal class declarations, our code will replace the text widget in the admin.

Step Three: Edit the custom_widgets.php file to suit

Now, we’ve got a new version of the default widget, we can edit it to suit our needs. In our case, we want to allow HTML in the title. For the text widget, we’ll find the lines where they are stripping HTML. In the class’s update function, find this line:

[php]$instance[‘title’] = strip_tags($new_instance[‘title’]);[/php]

and remove the php call that strips the HTML. Your replacement line should look something like this:

[php]
if (current_user_can(‘unfiltered_html’)){
$instance[‘title’] = $new_instance[‘title’];
}
else {
strip_tags($new_instance[‘title’]);
}
[/php]

Notice I put a security check in to make sure that the user is actually allowed to post with unfiltered html.

Also, in the forms function of our widget class, you’ll see that, before echoing to the screen the text, the code also once again strips the HTML out of the item:

[php]$title = strip_tags($instance[‘title’]);[/php]

Change this one to:

[php]$title = $instance[‘title’][/php]

If you don’t do this you’ll find that while you’ll store the correct data in the WP database, the admin widget edit form will not show you the HTML that you entered in the widget after saving.

Summary

So, using the built-in text widget as an example, you see how we can override any of the wordpress core widgets to add features in your theme. These changes will be upgrade safe, unlike editing the wp-includes/default-widget.php file, and will not clutter your admin with many new types of widgets that may or may not provide the functionality you are after.

One caveat to mention, while your code will be upgrade safe, if the WordPress crew comes out with a security patch that changes the functions in the default-widget.php file, you’ll have to edit your version of the functions in your custom file, so that you get the benefits of the security patch. All the WP releases mention the files that are changed from the previous version in the changelog.

WordPress Featured images, and custom image sizes

I recently built a site that let me explore the relatively new WordPress features of post thumbnails, along with the  ability to auto scale/crop images while they are getting uploaded to WordPress.

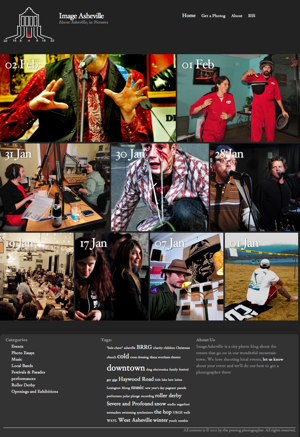
ImageAsheville uses the loop to display featured images from wordpress in almost a calendar layout.

The site, ImageAsheville, called for an unusual design, one similar to the fantastic AutoFocus WordPress theme (which I used as a basis for this alteration), but instead of doing very complicated functions.php code to find the first image in a post, I wanted to use the new featured image capabilities in WordPress.

The challenge to get the “autofocus effect” is that each entry in the loop needs to pull the featured image, but at a different size.  The newest entry has a wide image, while as the posts get older we use smaller and smaller images.   There are actually 6 image sizes that need to be generated when uploading a new featured image.

Step 1:   Enable the Post Thumbnails in your function.php in your theme.

Adding support to your theme is quite easy, just add the following line to your functions.php.

[php]
add_theme_support( ‘post-thumbnails’ );
[/php]

By enabling this part of wordpress, you will suddenly have a new admin sidebar available when you edit a post or page, the Featured Image sidebar. (below the publish, tags and category tools normally in wordpress).

Clicking the sidebar lets you choose an image and make it the “Featured Image” for your page or post.  You can reference in your theme the post’s featured image with a set of theme functions.  An example is showing the Featured Image in your category loop or on your homepage blog loop.

Full documentation on this can be found in the WP codex

Step 2: Add in the default image size for your featured image.

WordPress has some standard sizes for images (you have probably seen these when you upload an image and import them into WP, you have the thumbnail size, small, medium, etc…)

[php]
set_post_thumbnail_size( 100, 100 );
[/php]

We can use this to manually set the size of the post thumbnail default size this way.  In the example above, it will scale your thumbnails while keeping the aspect ratio (the longest side will be 100px, the other will be whatever it has to be to keep the same aspect ratio).

By adding a true as the third parameter:

[php]
set_post_thumbnail_size( 100, 100, true );
[/php]

the images will be cropped exactly to the size indicated. This is what I wanted for the ImageAsheville site. The div’s on the frontpage are exact in size, and I like the artistic effect you get when you crop an image automatically.

Step 3: Add any other sizes you need in various templates.

So, now that your default thumbnail size is correct, you’ll want other sizes of images for various templates.  These are added once again in your functions.php file, using the add_image_size() WP function.  Here’s the entries for ImageAsheville:

[php]
add_image_size( ‘p1’, 600, 300, true );
add_image_size( ‘p2’, 419, 300, true );
add_image_size( ‘p3’, 374, 300, true );
add_image_size( ‘p4’, 334, 300, true );
add_image_size( ‘p5’, 306, 300, true );
add_image_size( ‘p6-9’, 251, 300, true );
[/php]

You’ll notice that I give them particular names as the first variable, followed by the width and height, then the true flag so they don’t keep the aspect ratio (As we said before, I wanted them exactly this size).  The particular names I used are going to be related to the post order in the templates (hint: p1 is the first post, so it’s bigger).

Step 4: Add the new images sizes to your template.

So, now that we have all the sizes we actually need for our templates, we can then add them to our template files.  Use the the_post_thumbnail( ) function to call the default thumbnail inside your loop.  You can also call any particular size you need with the same function by passing the name to the_post_thumbnail() like this:

[php]
<?php the_post_thumbnail(‘p1’); ?>
[/php]

That would, in our example, link to the the 600x300px image we created above (called p1).

Advanced: Extra coding for ImageAsheville

On ImageAsheville, each slot in our frontpage is generated, just like normal wordpress, from calling the loop. I needed to loop though all the newest articles, and create a counter so I would know what size image to put in the section of the page. Also, the last row of images (6-9) are all the same size slots, so I set count to the string “6-9” if we are that far.
[php]
<?php
$i++;
if ($i >= 6){ $count = "6-9"; }
else { $count = $i; }
?>
[/php]

Then, using the counter to call the correct thumbnail image at the right size: [php]
<span class="attach-post-image p<?=$count?>">
<?php the_post_thumbnail( ‘p’.$count ); ?>
</span>
[/php]

CodeIgniter, Pagination and SEO… How to NoIndex CI pagination.

After building a site using CodeIgniter’s pagination library, our SEO team let us know that search engines was spidering deep down our pagination, and all those pages were diluting the link juice of our site.  The other problem is that our html title tag was identical for the search queries, no matter how deep into the pagination the visitor was.   While my first inclination was to add some details to the page title ( Search for <term> |  15-30 out of 300 | <sitename>), the SEO crew suggested we simply rel=”noindex” the link, to keep the deep pages out of search engine index.

Looking into the pagination class on CodeIgniter  (1.7.2), it became obvious that, while you can customize quite a bit of the html output of the pagination, you can’t add anything inside the anchor link for the pagination system.   So, it was time to override a base CodeIgniter library again.

Make a file inside your system/application/libraries directory called MY_Pagination.php, and put the wrappers at the top like this:

[php]
<?php
class MY_Pagination extends CI_Pagination {
var $link_extracode            = ‘rel="noindex"’;
/* CODE GOES HERE */
}
[/php]

This makes a new class, that extends the built in Pagination that ships with CodeIgniter. The first thing to do is to add a new variable that will hold our html that we are putting in the links. Whatever is in your var $link_extradata will be the default text that goes in the link, but this will be changeable in your controllers when you call the pagination. Just like any other pagination config item, you can change it and initialize the pagination system from scratch again:

[php]
$config[‘link_extracode’] = ‘rel="noindex,nofollow"’;
$this->pagination->initialize($config);
[/php]

This is standard of the pagination library, so you can refer to the documentation on this. We’re just creating a new variable to be used.

Now, open up the CodeIgniter’s Pagination Class, and copy the whole create_links() function (in 1.7.2, that’s line 103 – 239) and paste it into your new MY_Pagination.php file, replacing the /* CODE GOES HERE */ line.

Next, we need to edit our version of create_links() function with the added functionality. You’ll see, near the end of the create_links function a line (mine is on line 92 of my edited file), that looks like this:
[php]
$output .= $this->first_tag_open.'<a href="’.$this->base_url.’">’.$this->first_link.'</a>’.$this->first_tag_close;
[/php]
We just need to add our new variable, $this->link_extracode, into the link, like this:
[php]
$output .= $this->first_tag_open.'<a ‘. $this->link_extracode .’ href="’.$this->base_url.’">’.$this->first_link.'</a>’.$this->first_tag_close;
[/php]

That takes care of the first_tag, you’ll have to add the $this->link_extracode to 3 more anchor tags below this (line 100, 117, 125 and 131 in my verison of the file). Once all the anchor html tags have our custom code in them, and you save the file, you can then set any text inside the anchor via the default setting at the top of the MY_Pagination file, or in your controller via the $config option.

You can use this technique to add anything you like to the link, not just rel=’noindex’ as I have in this example. Drop me a comment below, and let me know what you are using it for.

New Site Launch, Crossroads Music

Crossroads Music Frontpage, November, 2010

The new frontpage of Crossroads as of November, 2010

Ponderwell is excited to announce that we have just completed the redesign of crossroadsmusic.com, an Asheville, NC based record label and online music store.  They have branched out over the years from Southern Gospel Soundtracks to a wide variety of Gospel and Bluegrass music.  The new site features a custom shopping cart to facilitate digital music delivery and physical sales of CD’s, DVD’s and merchandise.

The Crossroads website is a great example of the kind of complete web application that can be custom built by Ponderwell. Instead of boxing a complex business model into a canned shopping cart solution, we created a custom e-commerce solution that matches the company’s workflow.

We worked intensively for six weeks with the staff at Crossroads to provide a site which would both appeal to their current userbase, and extend their market reach to new Internet savvy users.  The new site is a framework that we will continue to expand upon for Crossroads as new needs and technologies become available in the coming years.

Our Favourite Features

Snapshot of the "Bluegrass" section

Searching for Bluegrass, the visitor can narrow the search by the faceted checkboxes on the left.

Faceted search to help narrow buyers to the products that really interest them.

One of the interesting challenges in planning the redesign was that with such a large catalog of artists and albums, we knew it was important to let the customer narrow down to the exact product they were intent on finding quickly, while letting customers who would rather browse in a more leisurely way find products that interested them. Every search, category or tag section of the site allows users to narrow the choices down to just a subset of the products easily, while the easy to use “browse” option gives them multiple options for looking around in a more leisurely manner.


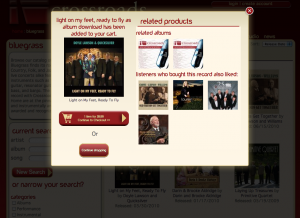
Modal window after adding something to the cart. Notice the related items to the right.

Modern Modal system for enhancing the shopping experience

We decided to add modal popups to help the user navigate the large catalog on Crossroads’ site without being overwhelmed.  Quick info popups let customers scan details of various albums without having to click through multiple pages to make sure of what they’re viewing before purchase, and tucking in advanced features like related albums based on sales history, bestsellers, and other enticements helps sells similar products based on the visitor’s interests.


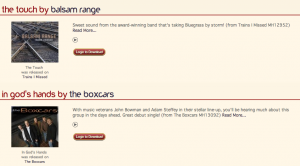
Free Singles, an example of what can be done with a customized cart.

Special features not available in any off the shelf e-commerce software

We built in features requested by the client that no premade software solution could do. A good example is the “Free Singles” section, where Crossroads gives away free songs every month to site visitors. Without a custom coded solution, they would have had to rely on promo codes, which could have lost them a lot of future potential buyers due to the unnecessary complication of having to go through the checkout process.


Selling as a CD, as a DVD, the parts as MP3's or all the parts as a digital album.

Non-Standard product types

Everyone loves samples, some people want a CD, others want MP3’s for their MP3 player, the Crossroads Store has it all, take your pick.

Not all online stores sell items that can be described as a physical item with a weight.  Most e-commerce systems try to impose a “one-size-fits-all” options system to cram your business model into their checkboxes.  Crossroads, though, has so many different kinds of products that there was no way they could get by with such a system, so we built one that handles everything they sell, from CDs and DVDs to audio books, downloadable PDF books, merchandise, you name it.   Each of these special cases required special coding above what a regular shopping cart can accomplish.


Ponderwell can work with you to take your unique business model and workflow and put it on the web, instead of trying to fit what you do into a neat package, the way someone else wants you to sell your product. If you would like to discuss getting your custom e-commerce site online, without making changes or compromises in your workflow, give Ponderwell a ring at 828.423.0667 or use our web contact form.

Starting a Web Design / Programming Firm

I was recently asked by an acquaintance what it took to start a design/programming firm, as he was considering getting into the business. I’ve learned a few things about it, having run a one-man company, and now a company that now has four staff, and hires out bits of work that we don’t have the time or inclination to manage (large flash jobs, windows hosts, etc..)

One thing that’s extremely important to us is finding a tight crew of contractors who we can 1) outsource smaller jobs to when we are busy and 2) hire for bigger jobs for the individual’s talents in discreet parts of the job. If you want to do more than flip brochure sites, you’ll need to form a mixed crew of design/programming and SEO talent. I would also suggest having your contractors be people in your local region. There will come times that you will need to talk to them in person, or perhaps  have them meet with a client.

We’ve got a crew of 4, two programmers, one designer and a bookkeeper / social media expert / apprentice designer. I would suggest you find your talent/niche and then find people you can subcontract for the other parts of the job. Otherwise, you’ll find yourself trying to do everything, and only working on 1-2 contracts at a time.

Get a workflow going, something like this recipe:

Week 1: Design spec, have the designer meet with client, work up the 2-3 mockups.
Week 2: Meet with client, go over mockups, try to finalize site layout, including SEO modifications if needed.  Also create list of content the client is responsible for providing.
Week 3: Build skeleton of site, programming time.  Make sure client is getting copy material during this week.
Week 4: Add content from client to site, skin site with customer design, more programming time.
Week 5: Final touches, test site (SEO staff does heavy evaluation at this step,if the client has hired/contracted that)
Week 6: Launch.

If you have a general guideline like this in mind, you can flow your staff time better, and run multiple jobs at once. Hopefully, the coding time will happen while the design staff is starting the next job. This model will not always work, as some projects are huge, but you should be able to tackle a couple of small jobs in the background while you are doing your large projects.

Choose a CMS platform that you get to know well (WordPress, Drupal, Typo3, etc…), so if the customer isn’t set on a platform, you can suggest one that you will not have to spend ages learning. Don’t lock yourself into a platform, you need to be nimble, but be an expert on one.

Choose a framework for more serious work to help speed up your development cycle for jobs that are by their nature larger than a site CMS framework. These kind of jobs, by their large nature, will usually not dictate your technology platform. I use CodeIgniter, but looked at Cake, Zend and a few others before settling on CodeIgniter for larger products.

Don’t hesitate to do e-commerce. But understand that road is fraught with danger. There’s no perfect shopping cart out there, and you ~will~ get support calls from customers. Shipping will fail to compute, CC#’s will be declined, and the client will involve you. There is no perfect e-commerce solution you can install and forget about. Because of this, make sure you build relationships with your client base, instead of building a site and moving on. Get involved in their business enough to know their business model as well as your own. Know what they mean when they reference parts of their workflow. A few bigger businesses like this, that constantly need improvements on their web presence, is your bread and butter.

Don’t try to do too much. Find a local computer handyman that’s responsible, and if your clients have computer problems with their workstations, make a reference. You can’t be in the business of helping them fix their computer and meet your other deadlines. It’s just not worth the money. Their computer problems will be continual, and they will always be urgent. Urgent in a way that interrupts your scheduling.

Get yourself some kind of system to manage your projects. We use ActiveCollab/Quickbooks, but I have a peers who use FreshBooks, just Quickbooks, ProjectPier, or Basecamp. It’s important that you track your hours. It’s also important that you prioritize your incoming support tickets and always reply to people promptly. It isn’t always recommended to fix everything the instant it comes to your email, so some kind of priority system is mandatory. Get an answer back to people within the hour, solve crises immediately, solve the little things within a day or two, and add features slowly, after you have considered the best way to implement them (server down, you get me right away, shipping computation wacky on low traffic site, you get me the following morning, you need a new feature added to your site, you’ve got me by the end of the week). Giving features some time lets you research the best way tackle it, giving you the best long term solution. After all, you’ve got to support it.

Try to give yourself some time every week to keep up on technology. Not “What is the latest smartphone like”, but “How do you use the mysql set datatype?”

Don’t hesitate to pass work up if the client’s expectations exceed either your firm’s timetable or your talent level. Only have one job running at a time that requires you to learn new talents. This is not mandatory, we’ve certainly bypassed this rule before, but it adds unneeded stress when you are trying to learn 2 disparate technologies at the same time, both on deadline.

I’ve been doing this for five years, and am constantly refining this workflow,  it is still a work in progress. Don’t treat any workflows as hard and fast rules, but try to use your workflow to estimate jobs and not get yourself stuck in an under- or over-employed state. I’d love to hear, in the comment section, what has worked for your webdesign/programming business.

Easily create WordPress 3.x hover/rollover menus with Jquery.

Ever since the release of WordPress 3.0 a couple months ago, people have been moving quickly to implement one of it’s most useful new features, the Custom Navigation Menus. They are easy to create, even easier to manage and generally help stop developers from constantly coming up with different and disperate solutions to this very common problem.

There are plenty of articles on how to set up and use Custom Navigation Menus, but we are going to focus here on how to easily style and apply some javascript (jquery) code to make them into fancy hover menus with the submenus being revealed on rollover. Moreover, this code utilizes a timeout, so that the menus don’t “flicker” as users enter and leave the submenus. This is required for a cleaner user interface.

First, the custom menus create html that looks like this:

[html]
<div class="menu-top-nav-container"><ul id="menu-top-nav" class="menu">
<li id="menu-item-145" class="menu-item menu-item-type-custom current-menu-item current_page_item menu-item-home menu-item-145"><a href="/">Home</a></li>
<li id="menu-item-129" class="menu-item menu-item-type-post_type menu-item-129"><a href="/about/">About</a>
<ul class="sub-menu">
<li id="menu-item-242" class="menu-item menu-item-type-post_type menu-item-242"><a href="/about/page1">Page 1</a></li>
<li id="menu-item-124" class="menu-item menu-item-type-post_type menu-item-124"><a href="/about/page2/">Page 2</a></li>
</ul>
</li>
</ul>
</div>
[/html]

I’m using a very simple example here, where there are 2 toplevel pages (home and about), and about has 2 subpages. You can style this menubar any way you would like, but the standard method of having the links appear directly below in a horizontal row, would look something like this:

[css]
.menu-top-nav-container { clear: both; min-height: <match your total height here>px; }
.menu-item a { margin-left: 20px;}
.menu-item a:link { text-decoration: none; }
.menu-item a:hover { text-decoration:none;}
.menu ul { margin: 0; padding: 0 list-style-type: none; }
.menu li { display: inline; position: relative;}
.sub-menu { list-style-type:none; display: none; position: absolute; width: <container size>px; height: <submenu height>px; }
[/css]

We are assuming you have named your menu “top-nav”, but you can change to suit. This will match all the standard styles that the menuing system will put into your site once you enable the menu and add it to the template.

The last part of this mini project is to add some jquery code to your js library or in the header:

[js]
<script type="text/javascript">
var $j = jQuery.noConflict();
$j(document).ready(function(){
var timer;
$j(‘#menu-top-nav li’).hover(
function() {
if(timer){
clearTimeout(timer);
timer = null;
}
$j(this).children(‘.sub-menu’).fadeIn();
},
function() {
timer = setTimeout(function(){
$j(‘.sub-menu’).fadeOut();
}, 1000);
}
);
});
</script>
[/js]

This code will traverse all submenu children of the parent and display them using the .hover() function in jquery. But we also set a timer to 1000ms (1 second), and leave the menu up when the user scrolls off, so that it will not flicker on and off as they go between the menu item and the submenu, or when they accidentally scroll off the submenu prematurely.

For SEO, it is also possible to remove the display:none from the css submenu entry, and add a $j(‘.sub-menu’).hide() as the first line of your javascript, but if you have a very complex page, you may have a flickering of the submenus on load as the dom loads the HTML, then the javascript hides the submenus. It’s not worth it to me, but may suit some folk.

That’s all there is to it. Happy Blogging.

CodeIgniter XSS Protection is good, but not enough by itself.

I have been looking at CodeIgniter lately mainly because a lot of my colleagues are using it already. As with most frameworks, I usually start using the framework in a project and then as I am developing the application, I notice some issues with the framework. One such case is with CodeIgniter’s built-in XSS protection. This functionality is quite nice (at least they included it in the framework) but there are some issues with using it that developers should be aware of.

Setting it all up

From CodeIgniter’s documentation (see  http://codeigniter.com/user_guide/libraries/input.html)…

CodeIgniter comes with a Cross Site Scripting Hack prevention filter which can either run automatically to filter all POST and COOKIE data that is encountered, or you can run it on a per item basis. By default it does not run globally since it requires a bit of processing overhead, and since you may not need it in all cases.

The XSS filter looks for commonly used techniques to trigger Javascript or other types of code that attempt to hijack cookies or do other malicious things. If anything disallowed is encountered it is rendered safe by converting the data to character entities.

XSS Protection functionality is turned off by default. To turn on this functionality, you simply either set the global configuration (i.e. system/application/config/config.php)…

$config['global_xss_filtering'] = TRUE;

…or, you can do it manually within your controller(s) like so…

$myvar = $this->input->xss_clean($data);

How CodeIgniter’s XSS  Protections Work

Once set up, you can now start to see what happens when you pass parameter values to your application. For example, lets assume we have a controller named HelloWorld which is coded like so…

class HelloWorld  {

public function index()  {

$myvar = $this->input->post(“myvar”);

$this->load->view(“myview”, array(“myvar” => $myvar));

}

}

A simple controller by any taste. So, the view is just as simple…

Hello World.<br />

<?php echo $myvar; ?>

If we supply a post parameter to our call to HelloWorld, the view will output the value we supply it. This is good way to test if the XSS filtering is working.

So, what happens when CodeIgniter knows that the XSS Protections are enabled and receives input from the client/browser? Well, as part of the Controller instantiation, the [CI_]Input class is loaded. The [CI_]Input class will firstly load the config.php file and see what settings need to be set then it will call the _sanitize_globals() private function. This function will setup everything and I will not get too deep into it other than to explain that it sets up the inputs into the application, including $_GET, $_POST, $_SERVER, and $_COOKIE as well as others. For each one of these constructs, it will call _clean_input_data() and xss_clean(). The function xss_clean() has the following code comments…

Sanitizes data so that Cross Site Scripting Hacks can be prevented.  This function does a fair amount of work but it is extremely thorough, designed to prevent even the most obscure XSS attempts.  Nothing is ever 100% foolproof, of course, but I haven’t been able to get anything passed the filter.

How cute. The developer goes on to record that he used the XSS Cheatsheet from ha.ckers.org. It would be nice if they actually read the material rather than simply looked over the various methods to get past various XSS filters listed on the page. Because, in 5mins I was able to get past this filter. I will show you why later.

Ok, to continue … xss_clean() will firstly remove any invisible characters like NULL terminators which could cause HTTP Parameter Pollution and/or HTTP Response Splitting issues. This is a good first step. The function continues on to decode URLencoded values, convert attributes and entities, remove invisible characters (again), and then…the magic. It will look for a standard list of elements, JS DOM Calls, etc. and then replace any found with the string “[removed]“.

The Issue(s)

The problems are: (1) this functionality is not turned on by default and (2) the authors of CodeIgniter decided to use a substitution method without the use of encoding before hand. I will focus on the latter issue here.

The age-old method of substitution to prevent XSS in web applications goes waaaayyyy back. MySpace and Yahoo! both used this methodology to protect their users from XSS attacks as well. The key to the substitution method is to be able to read the input to be able to convert it before outputting. But, like so many, most developers switched to a better method — encode-and-validate instead of find-and-replace.

The reason is simple: for web applications, there are literally a thousand ways to send a single object to the web server. With many, many different character sets (i.e. UTF-7) and encoding methods (i.e. Base64, Rot-13, URLEncoded, HTMLEntities, etc.) available to the user, it is really, really easy for a developer to miss out on one.

CodeIgniter developer(s) thought that by looking for common strings, they could write a XSS filter which replaces those common strings used in attacks to “removed”. Unfortunately, they missed out on Javascript events. So, a value for $myvar of fdsa” onload=”alert(1);” /> is possible to by-pass their protections. Yes, I know — we are not really outputting an image here to really use the onload event, but for all purposes, this should not possible.

Just what is the problem now?

The following results were found while testing various inputs to CodeIgniter (using the HelloWorld controller and view above)…

  • Input: fdsa” onload=”alert(1);” />, Output: fdsa” onload=”alert(1);” />
  • Input: fdsa<script>alert(1)</script>, Output: fdsa[removed]alert(1)[removed]
  • Input: fafa<script src=”http://ha.ckers.org/xss.html”>alert(1)</script>, Output: fdsa[removed]alert(1)[removed]
  • Input: fdsa<img src=”…” onload=”alert(1);” />, Output: fdsa<img  />

So, from the above tests, we can see that (1) CodeIgniter misses Javascript events when not within a HTML tag, (2) does not always strip the actual Javascript code, and (3) it only strips the attributes from normal HTML tags (i.e. IMG) it finds.

This means that the developer using CodeIgniter needs to remember these limitations or they can lead to a security issue. For example, if your view was to output an IMG tag or something based on the user’s input, you may introduce a XSS vuln to your application if you do not perform some additional encoding (and preferable validation as well).

What You Should Remember if Using CodeIgniter

You should always: (1) ENCODE and then (2) VALIDATE your inputs. Encoding can be done using the combination of the XSS protections already in CodeIgniter, but you should also use something like urlencode() or htmlentities() just to make sure. So, we can change our example HelloWorld controller to do just that…

class HelloWorld  {

public function index()  {

$myvar = urlencode($this->input->post(“myvar”));

$this->load->view(“myview”, array(“myvar” => $myvar));

}

}

By using encoding on top of the XSS protections within CodeIgniter, you can protect yourself against any limitations that CodeIgniter may have. You should additionally validate any data by data-typing (if possible) or if using strings, use a dictionary-lookup or a regular-expression check.

Using Apache to better secure WordPress

Securing WP with Apache

Needless to say, WordPress can be a beast at times. Just ask some of the web developers around Asheville. It can also be a pain to deal with security-wise because WP is a third party application built on other applications (i.e. PHP, Apache, MySQL) and all of these parts to the system need constant attention to avoid issues in security of your web presence.This is why I decided to start a series of posts to help demonstrate how WP can be locked down without affecting the needs of your web customers (per say).

In this first part in the series, I would like to explain how to lock down WP in several ways. Primarily, we will be dealing with Apache configurations and some internals to WP to accomplish this feat. But, in the end, you will see that you will still be able to use WP fully and perhaps even safer than before.

Where to begin: defining roles of users of WP.

When most developers setup WordPress, they do not think about the roles of the users using the system. There are fundamental differences between the authors, developers and visitors of the site in most cases, which is a major reason for using WP. But, one should also think about a separation even on the system level to help secure your WP installation. Before we start to configure the system and WP itself, ensure you have a clear understanding of whos who and who will be using WP in what ways. This will help you define the best system layouts later.

The plan for the WP system

Since we now have a clear understanding of those people that will be using WP and their roles on the system, we should be able to use this to draw up a good design for the WP system on a whole. For our examples in this series, we will assume the following…

  1. Visitors to the WP site can come from any place online and have the ability to read entries. Entries are normally business related information for the company.
  2. Authors of the primary content for the WP site are located in a home office (all one network). These guys post the actual content on the site.
  3. Developers and administrators of WP are on the same network as the authors.
Plan

Plan

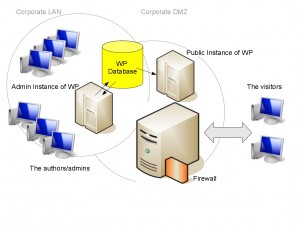
A good start to our plan is to draw out how the system will look in the end. Here is my drawr’ing based on the above assumptions. As you can see, there is a clear separation of roles for the users and this justified the separation of the systems as well. This also allows us to better protect our WP environment by restricting what actions can be performed in each instance. For example, the admins and authors on the corporate LAN will be able to post entries and upload content as usual. But, users outside of the corporate environment will need to upload/post to a different system which but it will all talk to the same database in the end. This is important from a security prospective because if someone were to attack the more hardened, public instance of WP visible to external users, then this would largely not affect the entire system.

You should not stop at just defining the system bounderies and roles, you should also start to think about how you are going use WP. This normally includes some use of third-party plugins to WP. You should be aware though that the number one security issue with using WP is normally dealing with plugins. So, keep the plugins to a minimum and ensure that any plugins you use should have good support and be updated when necessary.

Yes, this plan does require more investment, not only in setting it all up, but also in training and administration costs of running 2-3 systems for WP — rather than the traditional 1- system-does-everything approach. But, notice we are creating more freedoms for the authors/admins (who normally need it) and more security on the side of the users (visitors) of the site by logically separating them and their roles. This plan works on more corporate/government/small business environments, but may not work for some shops. Adjust where necessary, but try to keep the separations if possible.

Apache in the mix

We are going to setup two Apache instances. The first is a standard instance for the admins and authors within the (hopefully) locked down corporate environment. The other instance of WP is a more locked down version which talks to the same database as the internal instance for admins/authors/developers.

Firstly, use the Directory and/or Location directives to lock down the public instance(s) of WP for all files in the wp-content, wp-includes, and wp-admin directories. In this example, we will also lock down the wp-login.php page since this will not be used by external folks…

<Directory “/var/www/html”>

AllowOverride None

Options None

</Directory>

<Directory “/var/www/html/wp-content”>

Order Deny, Allow

Deny from all

<FilesMatch “\.(jpg|jpeg|gif|png|css|js)$”>

Allow from all

</FilesMatch>

</Directory>

<Directory “/var/www/html/wp-includes”>

Order Deny, Allow

Deny from all

<FilesMatch “\.(jpg|jpeg|gif|png|css|js)$”>

Allow from all

</FilesMatch>

</Directory>

<Location “/wp-login.php”>

Order Deny, Allow

Deny from all

</Location>

There is an uploads directory as well for WP located in the wp-content directory. For all purposes and instances of WP — this should be moved out of web root (where WP is installed). You should move this by doing the following…

  1. Create a directory in /var/www called uploads.
  2. Setup an Alias via Apache configuration to point to this new uploads directory.

Alias /var/www/uploads /wp-content/uploads

Now, we can set up some permissions on this more protective upload container…

<Directory “/var/www/uploads”>

Order Deny, Allow

Deny from all

<FilesMatch “\.(jpg|jpeg|gif|css|mov|mp4|mpg|avi)$”>

Allow from all

</FilesMatch>

</Directory>

By moving the uploads directory from web root, we are mitigating some attack vectors like Remote File Inclusion (RFI) and Local File Inclusion (LFI) which have popped up from time to time within WP. You will also need to tell WP where the new uploads directory is via the PHP — but we will get to that later when we actually install WP.

We have setup Apache for the public instance to be largely locked down and still allow content to be driven from inside the company. Next time, we will talk about the MySQL configurations to think about when deploying WP and later on we will be actually installing WP with these configurations.

CodeIgniter, extending the Cart class for robust product names

Codeigniter, one of the fabulous PHP frameworks now available to give you a jumpstart on your PHP custom code projects, has, as of version 1.7, a really handy cart class. I was able to get a cart system up and running without writing a lot of custom code and concentrate on only the custom needs of the client’s particular business model.

Out of the box, the cart class would not accept some of my products into the cart, silently refusing to add them to the cookie. It was any project with a comma or quotes in the product name. Looking at the base CodeIgniter cart class, line 30(ish), you will find:

[php]
var $product_name_rules = ‘\.\:\-_ a-z0-9’; // alpha-numeric, dashes, underscores, colons or periods
[/php]

and this variable is used in the _insert() function around line 186:

[php]
if ( ! preg_match("/^[".$this->product_id_rules."]+$/i", $items[‘id’]))
{
log_message(‘error’, ‘Invalid product ID. The product ID can only contain alpha-numeric characters, dashes, and underscores’);
return FALSE;
}
[/php]

So, the upshot is that it doesn’t silently ignore your request, it’s logging the error, but not to screen (or to your future customers). The CodeIgniter forum users suggest that developers change the regular expression held in $product_name_rules to something that matches their needs, including some suggestions to set it just to ‘.’ (matching everything) directly in the libraries/cart.php Cart Class and call it done. This is not the right way. If you are anything like me, you’ll upgrade CodeIgniter to the latest and greatest in the next year, long after you forgot your core file change, and the client will loose sales on some of the products that contain strange characters. The real solution is to extend the Cart class by putting your change in your application/libraries/MY_Cart.php file. This change simply extends the cart class and lets you specify a new regular expression to match your online store’s product naming needs.

Here’s my new MY_Cart.php file, extending $product_name_rules to include commas, parenthesis and quotes in product names. Adjust recipe, bake and serve according to taste:

[php]
<?php
class MY_Cart extends CI_Cart {
function __construct() {
parent::CI_Cart();
$this->product_name_rules = ‘\,\(\)\"\’\.\:\-_ a-z0-9’;
}
}
[/php]